Monday, March 3, 2008
New Soundcard
I changed out the sound card and everything is working beautifully. I went into Office Depot and found a Creative External 64-bit sound card that works simply. Also as an update to the Monitor I just input that code and it turns on/off with power to the car/computer
Sunday, February 10, 2008
Installation

Once again a huge thanks to my bro J.Z. I know nothing about car electronics, and he helped my wire everything. We spliced all the required connections inline. We used a soldering gun and electrical tape to make all the connections. We tucked all the cable in through the center console and through to the glove box. We wired up my new XM antenna (XM Direct + XM -> USB from Mp3Car), a USB Audio controller (with RCA output for my sub and speakers). In the final processes of cleaning up the install, hiding wires, and configuring all the options to my preferences. The install took about 3 hours.
I turn on the computer and its starting up in my car. Sweet! Too bad I can't see any of this because my screen is completely black. An email to tech support the next days recommends re-seating the ribbon cable, and using the power button to turn the monitor on (duh!). The power button is on a little strip of Motherboard and hardly looks like a button. Be careful a lot of the monitor has exposed electrical spots which will burn your flesh and tingle your entire arm (2x).
Getting the monitor to turn on automatically can be tricky. I'm going to try a post found at the MP3 car forums...
Auto Power On New Lilliput - Programming GuideWe'll see how it goes. Also a note, the Subaru speakers are wired to be run off the deck. I'm getting a new amp to rewire all the speakers.
You could try the following reset:
1.In VGA mode with your PC turned on (Recommended) , SLOWLY Input "588998" to come into the "factory setup" with the remote control unit.
Note: If you have trouble pulling up the "factory setup" menu try this solution View Thread
2.When the screen shows "--- - - - -", input "1270*10". The * means there are three modes you can choose: 0,1 and 2. If you choose 0, the monitor will go into standby mode when we switch on the power (default). Choose 1, the monitor will go into Power-On mode (This is what you want), and choose 2, it will go into the mode when you switch off the power.
In a nut shell you would enter "1270110" to activate the auto power on.
Sunday, January 20, 2008
Everything Else ...
Required Parts
- Touch Screen - 7" Lilliput VGA and USB
- Operating System - Microsoft Windows XP & OS X Leopard
- Front End Software - StreetDeck
- Power Supply - Carnetix P1900 w/ Mac Pac
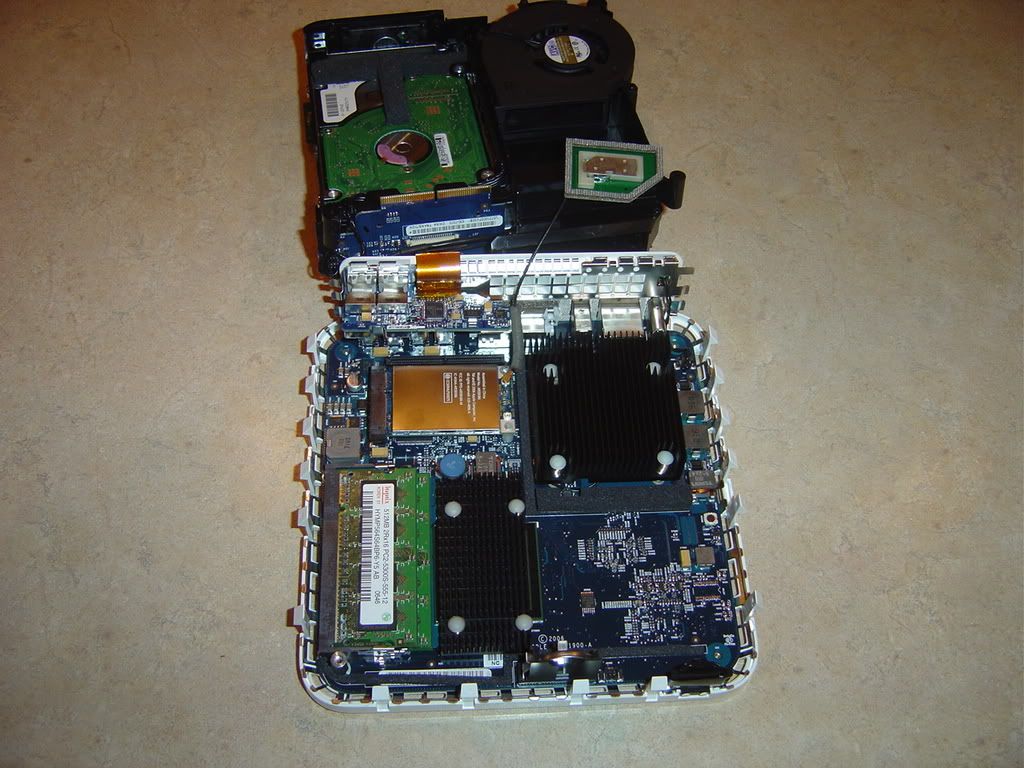
Also during the week was the process of upgrading the Mac Mini. What makes a computer better/faster? More RAM! my roomie had conveniently ordered some 2GB sticks for his laptop and had some extra 1GB sticks laying around. If you've never opened a Mac Mini good luck. There are no screws. Only 15 push pin connectors. After about 45 minutes, 2 razor blades, and a spatula later, we had the case open. Pulling out the guts and installing the new RAM took another 5 minutes. There we go!
The common idea behind the Mac Mini carputer is to use it as is, and use the "AMP" front end. I, however wanted GPS to be part of my carputer. This is why I chose StreetDeck (requires Windows). There are other options out there for front ends, but StreetDeck is nicely integrated and looks great. That brings us to installing Windows on the Mac Mini. Using Boot Camp is incredibly simple and worked first try (the first time). I got everything up and running in under an hour.
Boot Camp - Attempt 2
I had to reformat, starting from scratch for a Leopard install. This went through without a hitch. Next came boot camp. This time things went wrong. Every time I got to the windows installer it would go through the partition fine, but then after rebooting and trying to load the Graphical Installer, i would get an error message "Failed to Boot". After three days and countless hours I finally solved the problem. What happens is that during the install a boot.ini file for windows is written. During the partitioning process OS X gets assigned 1st, and Windows 2nd. In reality the partition are OS X [1], OS X 200MB Swap Partition [2], Windows [3]. One way to fix is to manually edit the boot.ini file in OS X on the windows partition. With my windows install, I couldn't see the windows partition on OS X. To solve this I deleted the 200MB swap drive, and viola! It Worked!
Sunday, January 13, 2008
The Carputer
I asked my roomie to help me build a carputer. I'm not really a hardware guy, but still wanted to make something myself. After a few days of scouring the web for prebuilt small form factor computers my roomie came up with the idea of using a Mac Mini. The benefits of the mac mini include pre-built in wireless, decently fast processors, bluetooth, and the fact other had used Mac Mini's as well. Thus began the search. The first place I started was apple.com and the 500$ price tag wasn't bad, but I could do better. Craigslists.org found me a seller around the corner, full warranty still in affect, and saving a little money.
The Specs:
Mac Mini
Intel 1.66 Ghz
512MB of Ram
Bluetooth
Wireless b/g
DVD Slot
With the key component in hand, there was no going back.
The Specs:
Mac Mini
Intel 1.66 Ghz
512MB of Ram
Bluetooth
Wireless b/g
DVD Slot
With the key component in hand, there was no going back.
Sunday, January 6, 2008
The Adventure begins
For Christmas I came into some money and decided to embark on a project I'd been thinking of for a while. The idea was pretty simple and I'd seen it done on the internet, and in some of my friends cars (slightly more generic, all in one). This blog is intended to be a walk through of my reasons, plans, trials, over comings, and shortfalls. I have to give a huge thanks to my friend J.Z. for helping with all the installation. I could not have done this without him.
Subscribe to:
Comments (Atom)